 Project Two - A simple vest
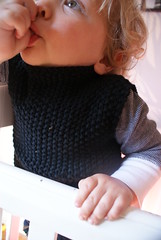
Originally uploaded by redmagThis is a lightweight cotton vest for the in-between months - the ones when it’s too cold to go without something to "protect the kidneys" as Nan would say but not cold enough to convince little people to put on a coat.
This pattern is for an average two year old.
What you need:
6 balls of Patons Serenity* in black
1pair of 7mm needles
1 stitch holder
1 needle
1 tape measure
Note the gauge is 13 stitches by 23 rows for a 10cm square after washing.
What to do:
Using two balls of yarn combined at once (i.e. as if they were a single strand) cast on (CO) 76 stitches.
Row 1 **knit (k) 1, purl (p) 1, repeat from ** until the end
Row 2 **p1, k1, repeat from ** until the end
Repeat the previous two rows until the garment is roughly 23cms from cast on. Finishing on Row 2 or the pattern
Next row - Continue the moss stitch pattern for the next 38 stitches (i.e. k1, p1,....) and transfer to the stitch holder, finish the row in the established moss stitch pattern.
***Continue the established moss stitch pattern on the remaining 38 stitches until it measures 11 cm from the row where half the stitches were placed on the stitch holder.
At the beginning of the next two rows loosely cast off 8 stitches and continue in the established moss stitch pattern.
Continue the moss stitch pattern for another 10 rows and cast off very loosely.
Transfer the 38 stitches on the stitch holder back onto the knitting needles and repeat everything from ***.
Sew together the neck/shoulder seam and the side seams and to daa!
More photos here....and here.
* This is a DK Bamboo and Cotton yarn that comes in 50g balls but feel free to substitute.