A few weeks ago Apartment Therapy featured a wonderful "how to" on painting a tree mural.
However it required you hand draw the outline and then do LOADS of taping before you started painting.
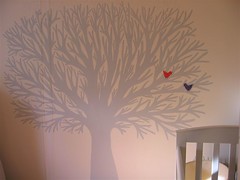
If you're anything like me - you hate painting prep work. I also lack confidence when it comes to drawing, particularly when drawing big things on very exposed areas like your walls. Like me you probably bookmarked the thread planning to paint the mural once you finally got round to attending those drawing classes you've been planning to attend for 10 years. Fortunately for me I had already painted my mural weeks earlier and it didn't require drawing talent or lots of taping (pictured above).
So here's a quick tour of my no-tape version of painting tree murals for those of us who lack confidence and or patience.
- Find an image you like. Either draw it yourself on a piece of paper or find one from another source.
- Project it onto the wall. There are a range of options for doing this - if you image is digital and you have access to a data projector connect it straight to your computer and project the image onto the wall. If not, that's OK as there are plenty of low-tech options. I'd recommend transferring your image onto acetate or a transparent film - I did this using a photocopier - and projecting it onto to the wall with an overhead projector.
- Trace you image in pencil. Use pencil so that you can rub it out at the end. However to speed things up and avoid having to erase lots of lines at the end I tended to trace a little smaller than the image so that the lines would be completed covered when i painted.
- Colour in within the lines. My only tip here is that I used a paint brush that was roughly the same width as most of the branches on my tree so that I could colour most of them in with one fluid brush stroke which is a lot quicker than doing the edges and then colouring them in.
All in all the whole thing was completed over about 4 hours spread over two days - I was 9 and a half months pregnant at the time and so it might take others even less time (I was a bit slow at getting up and down the step ladder for the high bits)
I was pretty happy with the way it turned out. The birds are made from fabric and paper and are blue tacked to the wall so they can be moved and removed. The tree is on a wall in a nursery so my plan is to have it reflect the seasons to add a bit of colour and excitement to the room. It's winter in Australia at the moment so the tree is bear for the time being, however come:
- September 1 - I plan to cover it with pink blossoms in a celebration of spring,
- December 1 - I'll be madly adding big green leaves to mark Summer, and
- March 1 - I'll be blanketing it in red, yellow and brown leaves to welcome autumn.
I'll keep you posted - spring is just around the corner.
(Edited - Two years have passed since I first painted the tree and we've seen the seasons come and check out the transformations for inspiration for your tree - Summer, Spring and Autumn)


8 comments:
I love this, what a great idea. :)
Thanks - I love the title of your blog.
Do you have a photo of your homemade light projector? I'm trying to follow your steps to do my own wall mural. Thanks!
I've just put a couple of photos up on my flickr account which might give you a better idea of how I set to "projector" up.
Here's a link
Beautiful and so professional-looking. Definitely something I will have to steal when I get my own place :D
I really love your tree! Where did you get the image?
one of my favorite things to use on wall murals is chalk. You can just rub it off with a dry cloth and don't have to bother erasing, like pencil. Super easy!
I know this was painted 3 years ago, but what kind of paint did you use?
Post a Comment